Exporting Data to XL Spreadsheets |
  
|
Exporting Data to XL Spreadsheets |
|
There are two main ways to export data to XL:
Exporting "Single Line" Data to an XL Spreadsheet: puts the prospect data on a single line, building up a form of prospect inventory spreadsheet.
Export Direct to XL: allows you to place selected prospect data in an XL file.
You can also export prospect results to NPD (Norwegian Petroleum Directorate) tables.
You can export key prospect/field data to an XL spreadsheet. The data will normally be written on a single row ("record") in the spreadsheet (see below for Multi-line Output). At the same time, you can put a copy of the current REP file into an archive folder (see below for Making Archive Files).
A typical use of this facility is to populate a prospect inventory.
There are two files necessary to make this operation work:
1.The XL spreadsheet.
2.A "template" file which links REP data to cell locations in the spreadsheet.
So, first create your spreadsheet.
[Note: From version 5.3 this can also be done from the template creation dialog. See 'Data Export Template' for more information.]
The spreadsheet can be anywhere on your system (it need not be in the REP program directory or a specific project area). All you really need to do is create the column headings. Each column that you want REP to populate should be named. Naming a cell is a particular XL feature. Click in the cell and then in the XL header bar where the cell location is shown (B2 for example) type in a name. (If you want to delete a cell name, you probably cannot do it by simple overtyping. Go to Insert | Name | Define and delete the old name before making a new one. This is because, in XL, a cell can have more than one name.)
If your column titles span more than one row then name the bottom cells in the row. Make sure all the named cells are on the same row.
It is not necessary that every column is named, just those you want REP to put data into.
[Note: It is now possible to use cell locations rather than names.]
Next, create the template file, see our 'Data Export Template' section to learn how.
[Note: The version 5.3 template maker cannot read old templates - but they do still work.]
When you choose the File | Export | to XL summary file, you will see the following dialog:
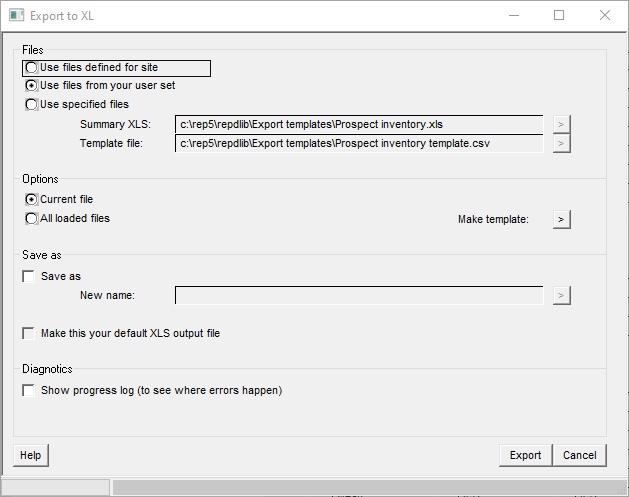
You can choose the export files defined for the site (in 'Setup | Installation | Location of files'), the export files defined for you the user (in 'Setup | User options | Location of files') or you can use specified files, in which case you should browse for those you want to use.
You can choose to export the current prospect file or all loaded files.
If you want to archive a copy of the current REP file as part of this export process then you need to do two things:
1.Define the archive path (folder) where you want the files to be written. This is done in Setup | User options | Location of files. (See 'User Options' for details.) This folder can be anywhere accessible to your system and is typically a network location (which has the added benefit of allowing your friendly IT department to move the folder, delete all the files, take the network down just at the wrong moment, etc. and therefore letting you practice venting a little anger - if you need to).
2.Define a column in your spreadsheet to record the archive file name. The archive filename is the prospect filename with a date/time stamp inserted at the beginning. Unless you are working at close to the speed of light, the archive filename will always be unique. The REP database reference is "table = pr_id" and "column = arch_file". So the line in the template file will be something like:
, Sheet1, archive, pr_id, , arch_file, ,
It is possible to put the prospect data on more than one line. Use cell locations rather than names for the spreadsheet references. Have a line in the template:
*firstrow, 2
This indicates the first data row in the spreadsheet (in this case "2", obviously),
Then you could have a set of rows like this:
! Water Saturation
,InputSheet ,BC1 ,pr_var ,sw ,v-mean , ,%
,InputSheet ,BC2 ,pr_var ,sw ,v-p90 , ,%
,InputSheet ,BC3 ,pr_var ,sw ,v-p50 , ,%
,InputSheet ,BC4 ,pr_var ,sw ,v-p10 , ,%
This would put mean Sw in the first row for this prospect and P90, P50 and P10 in the same column on the rows below.
In this process data from single prospect is exported to a "dedicated" spreadsheet (or in the case of multiple prospect export, to separate spreadsheets or worksheets of a spreadsheet).
There are two files necessary to make this operation work:
1.The XL spreadsheet.
2.A "template" file which links REP data to cell locations in the spreadsheet.
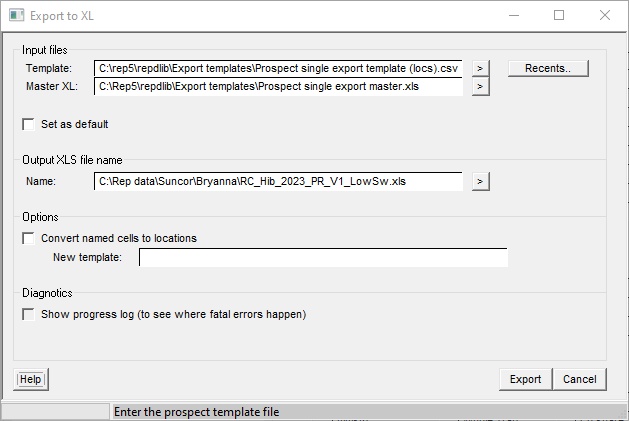
Input files |
|
Template |
The template file |
Master XL |
The master XL file. A copy is made and renamed as below. |
Set as default |
Check this box to make the template and master files your defaults going forward. |
|
|
Output XLS file name |
|
Name |
The name of XL file that is created. |
|
|
Options |
Our original templates used named cells as placeholders in the spreadsheet. This slowed down the export. You can convert the template to one with direct cell references (row, column). |
Convert named cells to locations |
Check to make a new template with any named cells converted to locations. |
New template |
The name of the new template |
|
|
Diagnostics |
|
Show progress log |
If an error occurs in the export (and Excel can be unforgiving) this log will show you roughly where it happens: you can then modify the template to make it work. |
First create your spreadsheet (or you can modify the EXP_XL.XLS file that is distributed with the program - you will find it in the "dbdefs" folder where the program is installed). Save the spreadsheet anywhere on your system - it need not be in the REP program directory or a specific project area.
The template file will refer to XL cells either by column and row (for example B22) or by name. Naming a cell is a particular XL feature. Click in the cell and then in the XL header bar where the cell location is shown (B22 for example) type in a name. (If you want to delete a cell name, you cannot do it by simple overtyping. Go to Insert | Name | Define and delete the old name before making a new one. This is because, in XL, a cell can have more than one name.) You may be thinking, 'names seem a bit of a pain' and so they are but they are very useful because if you move a cell or a group of cells the name moves too. So you can tinker with the layout, add stuff, etc. (and everybody does this) without having to change the template. Naming cells is recommended.
Next, create the template file - or modify EXP_XL.CSV, which is distributed with the program. This is a comma-delimited text file, which can be edited using any text editor or XL. Below the column identifiers at the top of the file, find the lines with eight columns. Each line in the template file corresponds to an entry in the XL spreadsheet. The template columns are:
1.Index flag: not used in this form of export.
2.XL Sheet: the name of the XL sheet in your spreadsheet. This will normally be the same for each entry in the template.
3.XL_Cell: the XL name of the cell you want to put data into. This can also be a row.column reference, e.g. B22. Do not name a cell P50 - REP will assume this is column P, row 50.
4.Table: the REP data table which has the data to export to the named cell.
5.Qualifier: normally a results phase modifier - e.g. Totgas. It is not always required.
6.Column: the REP table column name.
7.Row: the row in the REP table you want to export. Many REP tables only have one row, in which case this can be blank.
8.Unit: the unit you want the data to be written out in, e.g. bcm, mmstb, %. You are strongly advised to use the units entry for all reserve numbers otherwise you are in danger of having mixed units in your spreadsheet.
The REP data tables, with their qualifiers (in the case of results tables) and the column and rows are listed in the 'Data Dictionary'.
Most of the entries are self-explanatory. Some are less so:
Chances are in the table pr_ch. The row of the table determined which chance is being referred. Refer to the 'Data Dictionary' to see the list of chance codes you can use.
Reserve numbers are in the tables pr_rsum. There is a table for each hydrocarbon type. Set the table qualifier to the type you want - choose from GRV, OIP, GIP, WGIP, CIP, RECO, RECG, ASSOIL, ASSGAS, CONDO, CONDG, TOTOIL, TOTGAS, or BOE. Columns in the table relate to the reserve levels (P50, mean etc.). Lines in the table refer to different categories: these are net or gross (whole trap) - net and gr and unrisked, risked and economically successful volumes - unr, rsk and suc. Concatenate these two types with an underscore, e.g. net_unr, gr_suc, gr_rsk, etc.
Distributions can also be exported. They are in table pr_rvec, qualifier as for any results and columns as per the rows in the reserve number tables. In the "row" put an @ character. The distribution vector is written down the spreadsheet (and there may be up to 500 entries). For example:
,Dists,TOTOIL_value_gr ,pr_rvec ,totoil ,value_gr ,@ , , ,oil values
,Dists,TOTOIL_rel_unr_gr ,pr_rvec ,totoil ,rel_unr_gr ,@ , , ,relative probability
,Dists,TOTOIL_cum_unr_gr ,pr_rvec ,totoil ,cum_unr_gr ,@ , , ,cumulative probability
Several hours cursing and struggling with XL's graphing facility will allow you to make a very pretty picture of the results.
[Note: If you get stuck, please e-mail us and we will advise.]
The final step is to tell REP about the two files you have created: go to Setup | User Options and the Location of files tab, enter the file names in the XL export file box. Click [Save and Close] to update your defaults.
To make the export, load a prospect, do the calculations if necessary and then click File | Export | To Prospect file | Direct. The second option ("Specify") allows you to specify the master spreadsheet and template on the fly. You can also ask to write a progress log, this is very useful if the program crashes while writing to XL because you can see which piece of data is causing the mayhem and fix it in the template file.
Any errors in the export (for example if REP cannot find the named cell in the spreadsheet) are reported in the log file.
[Note: Do not have the XL spreadsheet open when you do the export. When XL has a spreadsheet open, it "locks" it so other programs cannot access it. This is also true of the template file if you are using XL to edit it.]
By default, the new spreadsheet is renamed to that of the prospect file (but with the extension .xls of course) and written to the REP data file folder. If a spreadsheet with this name already exists, you will be asked whether you wish to overwrite it, say [Yes].
You will see the spreadsheet being populated. Do not mess about with it while it is being populated - it gets upset.
The template file links REP data to spreadsheet cells. It is extremely simple - all you need to know are the names of the REP data elements and, of course, where you want to put them.
Distributed with the program is an example file called XLSPEC.CSV. You will find this in the program area of you installation, in sub-directory DBDEFS. It is a good idea to modify this rather than create a new one from scratch. Edit the file using an ASCII editor such as notepad or XL. There are a few header lines which you should leave as they are and then the bulk of the file consisting of REP data names and XL cell references.
The name of a REP data elements is in three parts: a table name, a table qualifier (used only for variables and phase results) and an element name. For example, the net working interest (exploration interest) is:
Table |
PR_LEG |
Qualifier |
|
Element name |
NWI |
The mean porosity is:
Table |
PR_VAR |
Qualifier |
POR |
Element name |
MEAN |
The P50 recoverable gas is:
Table |
PR_RES |
Qualifier |
RECG |
Element name |
P50 |
See 'Data Dictionary' for the current list of tables, table qualifiers and element names
The XL cell references are in two parts: sheet name and cell reference.
Once you have made the file to your satisfaction, it is a good idea to rename it and save it somewhere "safe", i.e. not in the program area; other users or a new version of the software may overwrite what you have done. The full filename of the template you wish to use should be entered in your user environment under the file locations tab.
To export the data from REP, load up a prospect and, if necessary, recalculate the results. Then go to File | Export | XLS macro file. You are prompted for a file name - by default this will be the name of the prospect file but with extension .csv. In your user environment under the file locations tab you can specify in which directory you wish to write these export files. The file is then written.
Load up your XL spreadsheet. You need to load in a macro, which we provide, called REPXL. So go to Tools | Macros | Visual Basic Editor. Your spreadsheet is hidden behind a new and formidable-looking VBA window. But do not panic - at least not yet. Choose File | Import. A standard file open dialog appears. You need to import one file: REPXL.BAS. This file is distributed with the REP program and should be in the program area in sub-directory DBDEFS. Once you have loaded this file, check to see what name XL has given it. Your spreadsheet may have an old copy of the macro already loaded. The correct one has the text (near the top):
EntryPoint8 provides access to standard windows file browser
You should probably delete any other 'RepXL' macros (highlight the old one and click File>Remove) and then close the VBA window. Your spreadsheet should re-appear.
Now go to Tools | Macro | Macros... You should see a list of all your attached macros, one of them should be called RepXL. Highlight this one, and click [Run].
The macro runs and a file browser window opens, prompting you for a filename. This is the same .csv filename as you entered when exporting the data from REP (see above).
Once you have done this process once or twice, it is extremely quick.
REP will fill in what it can of the NPD tables 2 and 4. Go to "File | Export to XL | to XL Prospect file | NPD reporting sheets". It copies the two master sheets and gives them the same name as the prospect. After the export you can open them up in XL. (Note: XL will not let you overwrite an open XL file � so remember to close them before re-exporting!).
NPD has its own risking scheme, and if you are not using it you will need to ask us to make a translation from your risking scheme to the NPD's - alternatively, overwrite the numbers in the tables.
Please advise us of any errors or obvious omissions.