User Options |
  
|
User Options |
|
User options consists of four tabs, the categories are:
General |
|
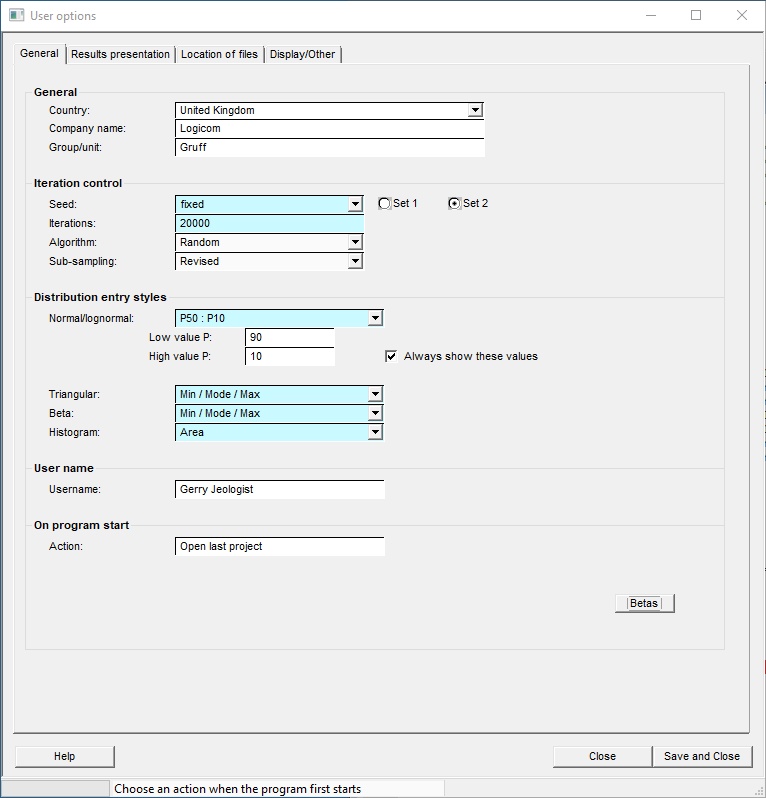
Country |
Enter the default country. This will become the default for the 'country' prompt whenever you start a new file. |
Company name |
Enter the default company name |
Group/unit |
Enter the business unit, user group or client. As with country, Company name and Group/unit will be assigned to the [Set as default] button, for relevant fields, whenever you start a new file. |
. |
|
Iteration Control |
|
Computers are unable to generate truly random numbers. Rather, they are given a starting number and from that derive a random(ish) sequence of numbers. But given the same starting point, they generate the same sequence of numbers. If you use a fixed seed, successive calculations on the same data set and with the same number of iterations will give identical results. |
|
Seed |
Choose a fixed or floating seed to begin random sequence. If you specify a floating seed, the program will derive a seed based on the time of day (hours, minutes, seconds and hundredths of seconds) at which you start the calculations. It is most unlikely that successive calculations will have the same starting seed. Using different seeds, the results calculated for the same input data will be different. The amount of difference will depend on the input data and on the number of iterations. Using a fixed seed is by no means consistent with the spirit of the Monte-Carlo method; but it is sometimes useful to be able to precisely duplicate previous results (if your photocopier has broken down, for instance) or if you are producing management reports. (Some company employees consider that Management gets very confused and bitter if numbers change for no obvious reason and are liable to go around sacking people indiscriminately. They are, of course, quite wrong to think this. Good managers do not need an excuse.) |
Iterations |
Enter the maximum number of iterations you wish the program to make. Increasing the number of iterations increases the stability of the results but the calculations take longer. For most data sets, 2000 iterations gives reasonably consistent results. Modern machines are so fast that 20,000 iterations of a prospect only takes a few seconds. Note that under some circumstances (if you are using models, for example, or in consolidations) REP may decide to increase the number of iterations, to ensure that each calculation element (model or prospect) is adequately sampled. |
Algorithm |
For future use. |
Sub-sampling |
With version 5.4 the sub-sampling has been improved. It affects the results a little, but not much; and any change is certainly within the statistical variation of the Monte-Carlo process. If, when recalculating prospects and consolidations, you want to get identical results to those of earlier versions set this option to "Original". This choice is not saved. When you restart the program it will start off with the revised algorithm. |
|
|
Distribution entry styles |
|
|
|
Normal/log-normal |
Choose the pair of values you wish to use to define normal/log-normal shapes. Choose "Custom" if you want any other pair of values, and enter the pair you want. See also distribution styles |
Always show these values |
Check if you want to see the the custom P values on the input dialog, whatever style you choose. |
Triangular |
Choose the entry style for triangular distributions |
Beta |
Choose the entry style for beta distributions |
|
|
Username |
|
Username |
Enter a user name to show on output (usually labelled "Author") |
|
|
On program start |
|
On program start |
When the program starts you can choose to do nothing, load the last file (either prospect or consolidation) or the last project. Unlike other options are on the More branch. If a file gets corrupted, opening the program with reading the file can mean that that the program effectively can never start. In this case start the program from a DOS box. Go to the program folder (e.g. c:\program files\logicomep\REP5) and type REP5 safe at the prompt. This overrides the setting and lets you open an uncorrupted file.
|
|
|
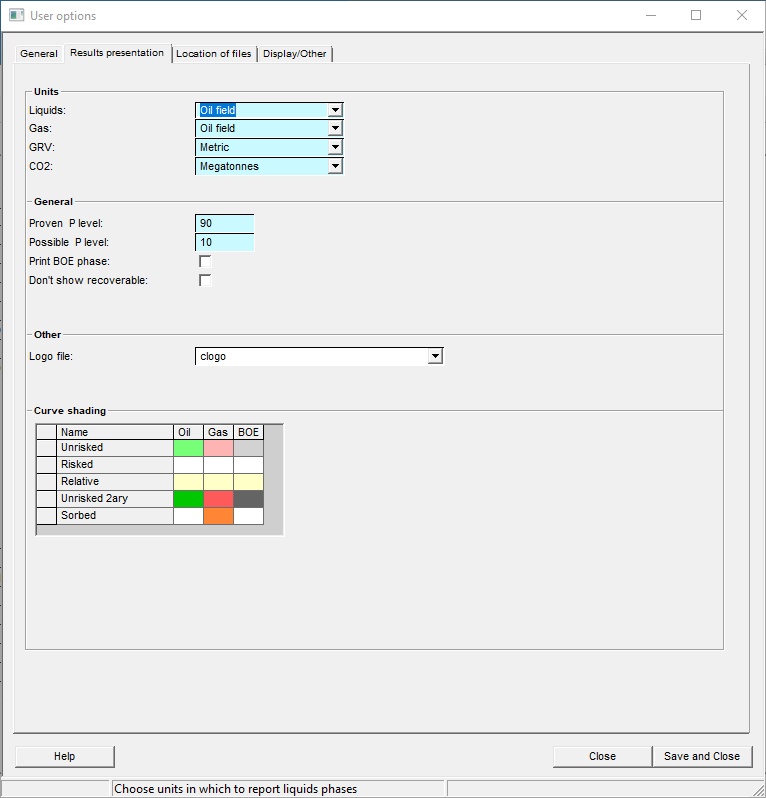
Results Presentation consists of a number of options that allow you to customise how your results are to be presented.
Units |
|
You may specify whether you want the results of the reserve calculations to be presented in metric or oil-field units. Separate units systems may be specified for hydrocarbon volumes (Liquids/Gas) and GRV volumes (GRV). [Note: This can be overridden at any time, when you are running the program.] |
|
|
|
General |
|
You may specify what P level corresponds to the "proven" or "downside" (Proven P level) and what P level corresponds to the "possible" or "upside" (Possible P level). The words "Proven" and "Possible" here used in a loose sense. By default - and common practice; also recommended by PRMS - the "proven" level is P90 and the "possible" level is P10. |
|
Print BOE phase |
Check to print the BOE phase as part of the prospect/consolidation summary |
Don't show recoverable |
Check to only print in-place volumes. |
|
|
Other |
|
Logo file |
Your company logo may be displayed at the top right-hand corner of the output sheets. The logo is read from a file, which must be produced by us. The file must be placed in the dbdefs folder, in the program installation area. It must have the extension .pic or be a 256-colour .bmp file. For example, the Logicom logo file is c:\rep5\dbdefs\logicom.pic. If you are unable to create a 256-colour .bmp file, please send us (to support@logicomep.com) your company logo (as a .jpg or other standard image file) and we will convert it for you. Since some companies have more than one logo, there is a facility here to choose which one you want to use. When specifying the file to use do not enter the path or the file extension. |
|
|
Curve shading |
|
Curve shading |
Choose curve shadings for various volume categories.
|
Export files are used to control how and where data are exported to XL. There are two types:
Single line export puts the results of a prospect or consolidation into an "inventory" spreadsheet - one line per prospect/consolidation. See Exporting "Single line" Data to an XL Spreadsheet. The archive folder is used if you want to make a copy of the prospect file and any associated Files (maps, spreadsheets, etc.).
Direct export puts the prospect or consolidation data into a copy of a master spreadsheet. The XLS master spreadsheet file is copied to the data area and data for the current prospect put in it according to the template file. Separate sets may be used for prospects and consolidations. See Exporting data to XL Spreadsheets.
When REP is first installed, example master and template files are included with the distribution. These are part of the Site defaults. You can copy these to this "user defaults" area by clicking "Use site defaults". In any given company, the site files may be modified to suit, and these should be specified in Installation options so that they are available to every user here.
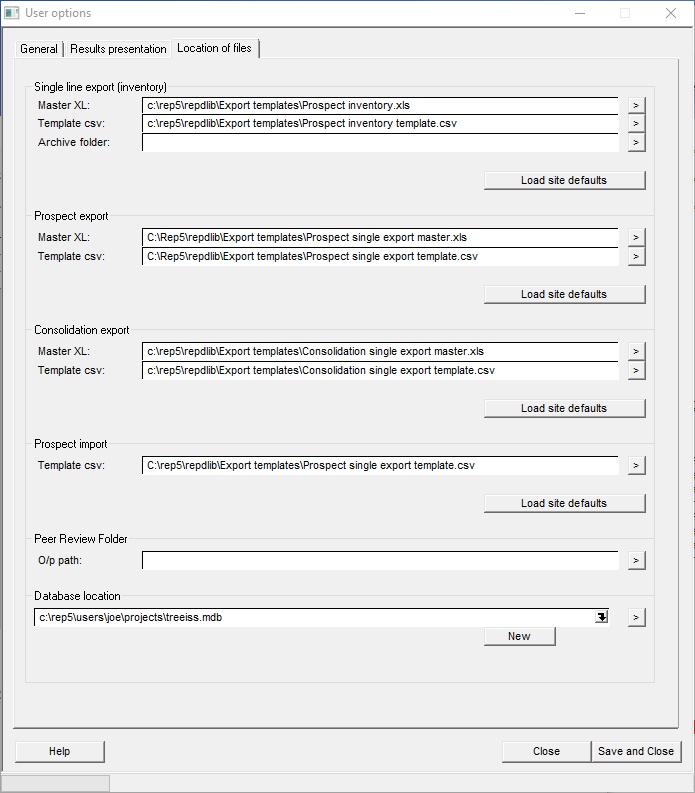
Single line export (inventory) |
|
Master XL |
Enter the master XL spreadsheet with the inventory data |
Template csv |
Enter the template file |
|
|
Prospect export |
|
Master XL |
Enter the master XL spreadsheet |
Template csv |
Enter the template file |
|
|
Consolidation export |
|
Master XL |
Enter the master XL spreadsheet |
Template csv |
Enter the template file |
|
|
Prospect import |
|
Template csv |
Enter the template file to be used for prospect import from XL. |
|
|
Pier review folder |
|
O/p path |
Enter a location to place "peer reviewed" files. Peer reviewed files are saved as part of the "Validate and Archive" menu option. |
|
|
Database location |
|
File name |
Enter the database file name. The "New" button starts off a new one, for which you have to give a new name of course. The entry drop down will give you the recent databases you have used, you can click one to open it. The > arrow browses for an existing file. |

Display |
|
Font size |
This screen allows you to change the font sizes used by the various elements of the display. If you change the size of the dialogue font, it will reset the other fonts to a recommended size so that they look consistent. We recommend that you set this to between 8 and 12 on most standard resolution displays but on some high resolution displays, you might want to set the font size quite large (e.g. 20) Optionally, if you want to change, say, the size of the tab fonts (e.g to make them smaller so that all the tabs fit onto the window size), you can adjust these individually. You might wish to change the box font for aesthetic purposes before doing a screen grab. |
Refresh |
Click on "Refresh" to see the effect of the change. |
|
|
Other |
|
User risking scheme |
Most companies choose a risking scheme and stick with it. In this case choice of risking scheme is part of the installation and cannot be changed by individual users. But some consultancies are obliged to mirror their clients' schemes, and individual users can use their own schemes. This option must be enabled in the installation options. |
This screen allows you to change the font sizes used by the various elements of the display. If you change the size of the dialogue font, it will reset the other fonts to a recommended size so that they look consistent. We recommend that you set this to between 8 and 12 on most standard resolution displays but on some high resolution displays, you might want to set the font size quite large (e.g. 20)
Optionally, if you want to change, say, the size of the tab fonts (e.g to make them smaller so that all the tabs fit onto the window size), you can adjust these individually.
You might wish to change the box font for aesthetic purposes before doing a screen grab.
Click on "Refresh" to see the effect of the change.